Rainmail Server Administrator Guide
ContentsIndexHome
PreviousUpNext
Installation Steps

Installation is relatively straightforward and is GUI driven. Following the given steps will ensure a trouble free and easy installation:

  1. Logon as root. Rainmail Server modifies your system configuration files and needs root permission to do them.
  2. Start X GUI (if not already started). This can be done by typing startx at command prompt.
  3. Open up a new terminal by using Start -> System -> Terminal
  4. Place Rainmail Server CD in the CD-ROM drive. The CD will mount automatically and CD contents will be available in one of the following directories:
    • /media
    • /media/cdrom
    • /media/cdrecorder
  5. In the Rainmail CD, you will find the following folders/files:
    • rainmails.zip This is the Rainmail Server installation program contents.
    • RIS-R27-cos5.10 folder. Contains the additional scripts for installing Rainmail Server on Cent OS 5.10
  6. Unzip the rainmails.zip file into the folder /root as follows:
    • unzip rainmails.zip -d /root
    • This will create a folder called /root/rainmails which will contain the Installation executable.
  7. Start the setup program by running the following commands:
    • cd /root/rainmails
    • bash setup
  8. This will open up the Installation program. Please note that all the parameters you enter in the setup program (with the exception of Use Location based Email setting) can be changed even after installing the software. Therefore, if you made some mistakes in the Install program, don't worry. The values can always be corrected after the software is installed. However, entering the correct value during the install phase is recommended.
  9. The install program is Java based. The program will check if you have Java installed on your machine and if not, will install it for you. After installing Java, setup program will begin to execute. The Rainmail Package Selector Interface appears.

  1. Click on Next >> to continue. That will bring up the following Window:

  1. The window displays the list of modules in Rainmail Server. Check all the modules that have been purchased and need to be activated.
  2. When Email server is chosen, a further choice of following three is given:
    • RIS Standard Email service
    • Catchall Email Service
    • POP Email Service
    • One of the above needs to be selected for Installation The following table can be used to decide which option to select:
Parameters 
Option to select 
Email server is going to be deployed as Primary Server with no backup on the Internet
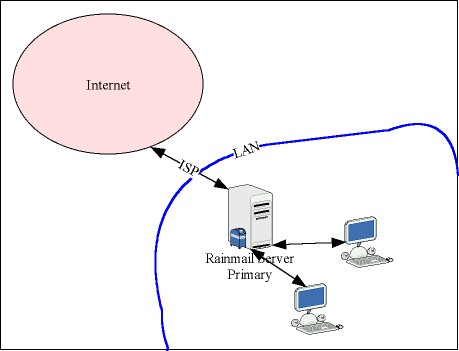
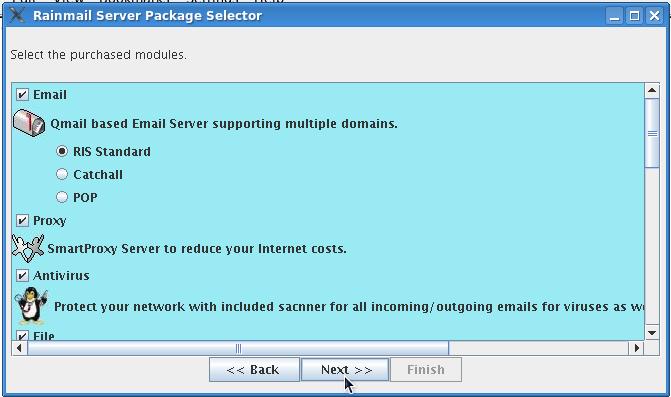
 
RIS Standard 
  1. Email server is going to be deployed as Primary Server with backup on Internet.
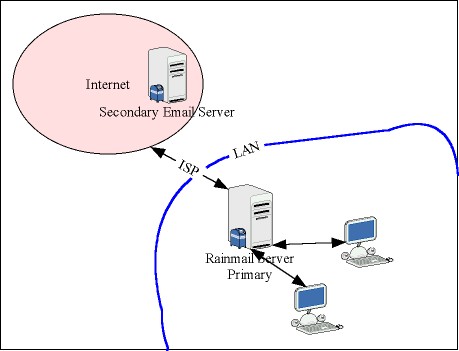
  1. Backup Email Service is provided by Carizen
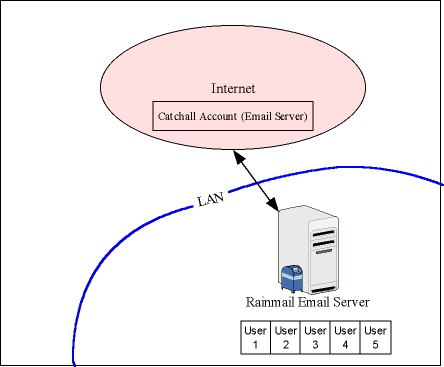
 
RIS Standard 
  1. Email server is going to be deployed as Primary Server with backup on Internet.
  1. Backup Email Service is provided by an external (non-Carizen) Email Service provider.
  2. External email service provider is providing a Catchall box to download emails.
 
Catchall 
  1. Email server is going to be deployed as Primary Server with backup on Internet.
  1. Backup Email Service is provided by an external Email Service provider.
  2. External email service provider is providing individual POP accounts to download emails.
  1. Need to have (possibly) different passwords for email account on the Backup server and on the Rainmail server.
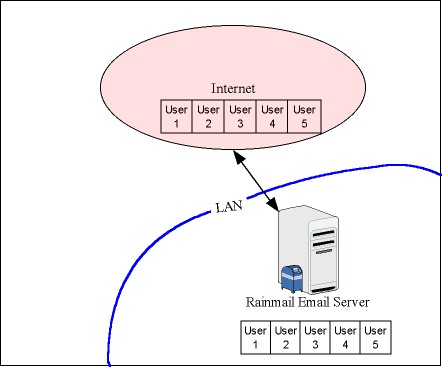
 
RIS Standard 
  1. Email server is going to be deployed as Primary Server with backup on Internet.
  1. Backup Email Service is provided by an external Email Service provider.
  2. External email service provider is providing individual POP accounts to download emails.
  1. Passwords of an email account in local Rainmail Server will always be same as the password of the email account in Backup server.
 
POP 
  1. Rainmail Email server is going to be deployed only locally with External Primary Server on Internet.

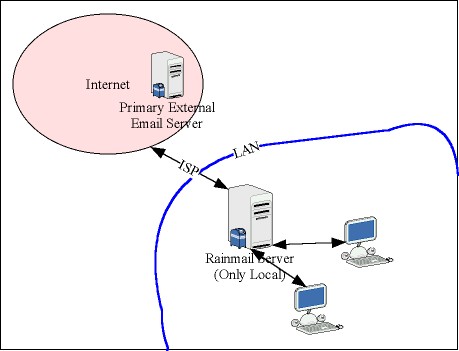
2. External Email Service is provided by Carizen 
RIS Standard 
  1. Rainmail Email server is going to be deployed only locally with External Primary Server on Internet.
  1. External Email Service is provided by a non-Carizen Email Service provider.
  2. External email service provider is providing a Catchall box to download emails.
 
Catchall 
  1. Rainmail Email server is going to be deployed only locally with External Primary Server on Internet.
  1. External Email Service is provided by non-Carizen provider.
  2. External email service provider is providing individual POP accounts to download emails.
  1. Need to have (possibly) different passwords for email account on the External server and on the Rainmail server.
 
RIS Standard 
  1. Rainmail Email server is going to be deployed only locally with External Primary Server on Internet.
  1. External Email Service is provided by non-Carizen provider.
  2. External email service provider is providing individual POP accounts to download emails.
  1. Passwords of an email account in local Rainmail Server will always be same as the password of the email account in Backup server.
 
POP 
  1. For selecting other modules, scrolling down will be required. That will bring up the following dialogs:


  1. Once all the purchased modules are selected, click on Next >> to proceed with the installation.
  2. The installation steps are different depending on selection as follows:
    • No Email server selected
    • Email Server selected with RIS Standard option.
    • Email Server selected with Catchall option
    • Email Server selected with POP option.
  3. These installation steps are given in different sections. To proceed, identify the section that corresponds to your selection and follow the steps in the same.
Copyright (c) 1999-2014. All rights reserved.
What do you think about this topic? Send feedback!